How to Add to the Shell Path in macOS Big Sur and Catalina using Terminal

The shell path for a user in macOS is a set of paths in the filing system whereby the user has permissions to use certain applications, commands and programs without the need to specify the full path to that command or program in the Terminal.
So instead of running something like this, with a path to the command or script:
/Users/yourusername/bin/myscript.sh
You can just type the command, regardless of where you are in the filing system:
myscript.sh
Your shell path is a bunch of absolute paths of the filing system separated by colons :
You can find out whats in your path by launching Terminal in Applications/Utilities and entering:
echo $PATH
And the result should be like this..(the last one when you have Xcode)
/usr/local/bin:/usr/bin:/bin:/usr/sbin:/sbin:/Library/Apple/usr/bin
So this is stating that you can run Unix style applications or commands located in 5 or 6 default locations of a certain path in the filing system:
- /usr/local/bin
- /usr/bin
- /bin
- /usr/sbin
- /sbin
- /Library/Apple/usr/bin (If you have Xcode)
These directories are not visible by default in the filing system but you can make them visible.
Adding a Temporary Location
You can add extra locations to your path, in the myscript.sh example above it’s location /Users/yourusername/bin/ which is not in the default path, you can add it in Terminal like so:
PATH=/usr/local/bin:/usr/bin:/bin:/usr/sbin:/sbin:/Users/yourusername/bin/
So here I have copied my existing path and added the new location on the end, colon separate the paths. Test it by running echo $PATH again in the Terminal.
One of the disadvantages of this is that the new location will only be honored for that particular Terminal session, when a new Terminal window is launched it will have the original default path again.
Adding in a Permanent Location
To make the new path stick permanently you need to add or edit a .zshrc file or a .bash_profile or .bashrc in your home directory and add to the path there.
This configuration file controls various Terminal environment preferences including the path.
In macOS Big Sur and Catalina the default shell is Zsh aka the Z Shell which has the .zshrc file to control it (previously it was the Bash Shell using .bash_profile or .bashrc ).
cd
This command moves you into home directory, if you are already in the home directory then you are in the right spot. Check you have a .zshrc file by running the ls -la command which shows the directory files.
If you don’t have it, create it and edit it with a command line editor called nano:
touch .zshrc
nano .zshrc
If you do have it just edit it:
nano .zshrc
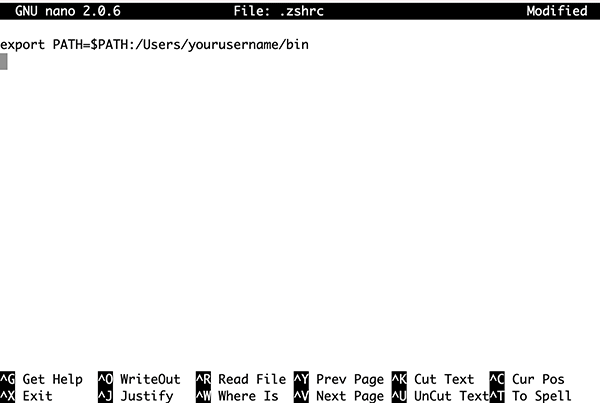
export PATH=$PATH:/Users/yourusername/bin
Add in the above line which declares the new location /Users/yourusername/bin as well as prefixing the original path declared as $PATH.

Also if you have an existing .zshrc file it may have these lines in it:
# If you come from bash you might have to change your $PATH.
# export PATH=$HOME/bin:/usr/local/bin:$PATH
Just uncomment the second line
# If you come from bash you might have to change your $PATH.
 export PATH=$HOME/bin:/usr/local/bin:$PATH
Add in any extra paths colon separating them with no trailing slash
Saving the Edits in Nano
Save the file in nano by clicking ‘control’ +’o’ and confirming the name of the file is .zshrc by hitting return. And the ‘control’+’x’ to exit nano.
Either refresh the .zshrc file by using source or restart the Terminal:
source .zshrc
So now when the Terminal is relaunched or a new window made and you check the the path by
echo $PATH
You will get the new path at the front followed by the default path locations, all the time
/usr/local/bin:/usr/bin:/bin:/usr/sbin:/sbin:/Library/Apple/usr/bin/Users/yourusername/bin
Rearranging the default $PATH
If you needed to rearrange the paths in the default $PATH variable, you can just do that and leave off $PATH.
So lets say you want /usr/local/bin at the beginning to take precedence you can add the default path like so inside .zshrc
export PATH=/usr/local/bin:/usr/bin:/bin:/usr/sbin:/sbin
And then you can slot in other paths as required.


