How to Write to Windows NTFS USB Disk Drives on macOS Mojave and Sierra
By default, you can’t write to Windows NTFS USB drives and hard disks on macOS as they appear as read-only on the Desktop.
You can write to these disks with a few installs and tweaks in the Terminal, which will make all NTFS drives writeable – there are also some commercial point and click apps that can get the job done if you don’t fancy wading into Terminal commands.
This has been tested in macOS Mojave and Sierra.
Get Xcode and Brewed Up
To start with you are going to need Xcode and some Unix style application packages – and what makes this easy on is Homebrew, a package manager for macOS, follow this guide if you haven’t already got it, it will get you up to speed on both Xcode and Homebrew first, after that come back here and tackle the rest below which involves installing a couple of apps and tweaking a couple of files.
For Xcode you may have an older version you can prompt the updated tools installation with…
xcode-select --install
Once you have Xcode and Homebrew the following will allow you to write to NTFS disks.
Disable SIP Protection
You’ll need to disable SIP protection which you then can re-enable again.
Reboot your Mac into Recovery Mode by rebooting and holding down ‘command’ + ‘r’.
From the menu bar click Utilities and launch a Terminal session and enter
csrutil disable
You will be told System Integrity Protection is disabled
Reboot – (to enable it back after you finish the process see the link).
Install FUSE for macOS
Download and install the latest FUSE for macOS, this will add a new preference pane but no configuration is needed. The app make it possible for other software to extend the capabilities of the filing system such as ntfs-3g
Launch Terminal:
Install ntfs-3g
brew install --cask osxfuse
You must reboot for the installation of osxfuse to take effect.
brew install ntfs-3g
At this point you need to change the mount_ntfs file, the new file will allow the writes to NTFS disks, these commands will back up the original and then link to the modified mount_ntfs file as supplied by Brew/ntfs-3g
Back up the original
sudo mv /sbin/mount_ntfs /sbin/mount_ntfs.orig
Link to the new
sudo ln -s /usr/local/sbin/mount_ntfs /sbin/mount_ntfs
Re-attach your NTFS drive
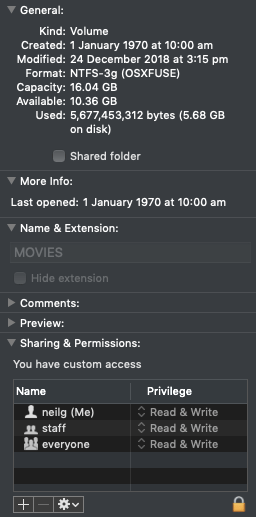
That’s it, now all mounted NTFS drives can be written to, if it doesn’t work just disconnect/connect the NTFS drive and/or also do a full reboot.
Commercial NTFS Apps for macOS
If this free solution does not work for you there are always some paid apps to do the job, one that I have used previously is Tuxera NTFS for Mac which offers a 15 day try before you buy offer, works great, also there is Microsoft NTFS for Mac by Paragon, this is also a try before you buy 15 day usage, I haven’t personally tried this one. Both apps are similarly priced around USD$20.
