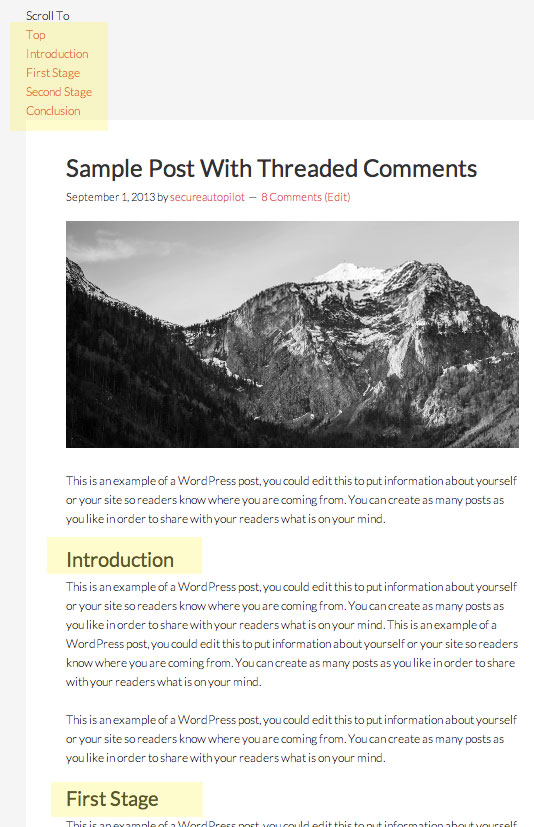
Controlling long document display on a web page can be greatly enhanced with a Javascript solution like ScrollNav which collates all of a defined HTML element in a document like a heading tag such as a h2, puts all of the elements set up in a navigation markup done for you and keeps the links to the relevant place in the layout – the navigation can also be set to be fixed in position.

How it works
ScrollNav works via targeting a CSS Class selector of a containing element of your document, it then examines the inner content of that container and creates a navigational list of all the h2 elements.
The <h2> is the default element, this can be changed.
When the list is collated the mark up for it is placed outside of the containing element, before the document and links each item in the list to the corresponding part of the page, exactly like a page anchor link.
The benefit is that the navigation is automatically created and updated for you and stays in place whilst the page moves, it is a lot easier in terms of scrolling and intuitive in terms of accessibility.
Installation
Installing ScrollNav Javascript is done by adding in the minified javascript from ScrollNav (in the dist directory) into your themes javascript directory and then enabled in your functions.php file which will enqueue the script.
//ScrollNav
function scrollnav_scripts_styles() {

	wp_enqueue_script ( 'scrollnav', get_stylesheet_directory_uri() . '/js/jquery.scrollNav.min.js', array( 'jquery' ),'1', true );
}

add_action( 'wp_enqueue_scripts', 'scrollnav_scripts_styles' );
The above function will ensure the dependency jquery is loaded as it is required and also place the script in the footer.
Initialise
To initialise the script you need to target a containing element on the page, in WordPress the actual post can be targetted with .content .post as doing just .post may also target the sidebar content.
So all posts would be:
jQuery('.content .post').scrollNav();
Add this content to a new script which will trigger the jQuery and ScrollNav scripts to fire, name the script scrollnav-init.js and also file in your themes js folder and then also enqueue this – so now the function looks like so:
//ScrollNav
function scrollnav_scripts_styles() {
	wp_enqueue_script ( 'scrollnav', get_stylesheet_directory_uri() . '/js/jquery.scrollNav.min.js', array( 'jquery' ),'1', true );
	wp_enqueue_script ( 'scrollnav-init', get_stylesheet_directory_uri() . '/js/scrollnav-init.js', array( 'scrollnav' ),'1', true );
}
add_action( 'wp_enqueue_scripts', 'scrollnav_scripts_styles' );
This ensures the scripts are loaded in the correct order and also positioned at the footer of the page.
You can alternatively target selective posts by using conditional statements for certain post ids for example:
//ScrollNav
function scrollnav_scripts_styles() {
if( is_single( '9402' ) ) {
	wp_enqueue_script ( 'scrollnav', get_stylesheet_directory_uri() . '/js/jquery.scrollNav.min.js', array( 'jquery' ),'1', true );
	wp_enqueue_script ( 'scrollnav-init', get_stylesheet_directory_uri() . '/js/scrollnav-init.js', array( 'scrollnav' ),'1', true );
    }
}
add_action( 'wp_enqueue_scripts', 'scrollnav_scripts_styles' );
Once the script is correctly firing you will notice the added navigation which will sit above your post/page.
Navigation Layout
By default the Nav element is placed before the document. You need to add CSS to change it.

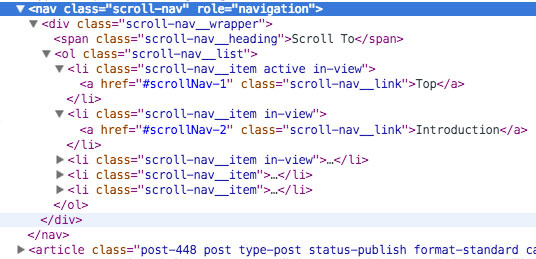
Navigation is added in a HTML5 Nav element with a .scroll-nav class

Corresponding HTML markup
Adding CSS
Add CSS to the scroll navigation. The key elements to style are:
<nav class="scroll-nav">
    <div class="scroll-nav__wrapper">
        <span class="scroll-nav__heading">
        <ol class="scroll-nav__list">
            <li class="scroll-nav__item">
                <a class="scroll-nav__link">
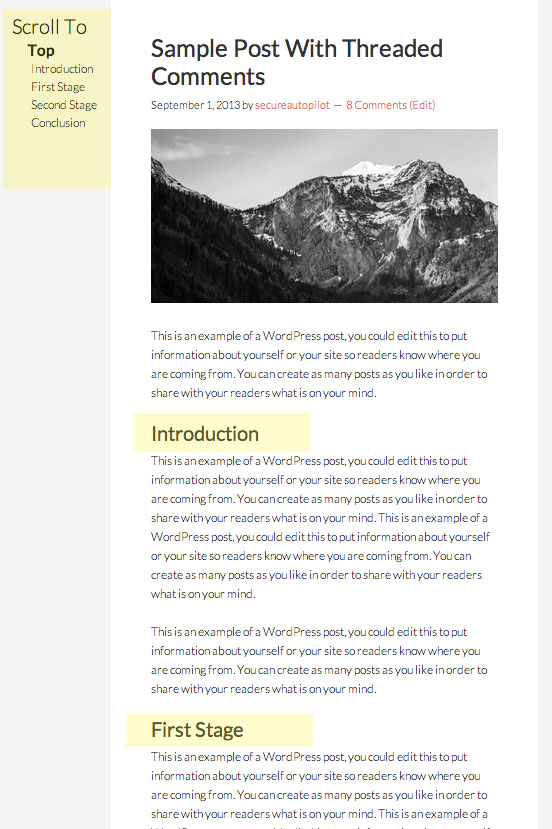
Styling the navigation needs to be done as no CSS is provided, the CSS below has been used for the sample page and almost like this page, the. One of the key things is setting the top attribute on .scroll-nav.fixed .scroll-nav__wrapper which fixes the navigation in place when the user scrolls past that pixel height.
/*ScrollNav Demo
---------------------------------------------------------------------------------------------------- */

.content .post {
	margin-left: 160px;
}

.scroll-nav {
	position: absolute;
}

.scroll-nav.fixed .scroll-nav__wrapper {
	position: fixed;
	top: 60px;
}

.scroll-nav__wrapper {
	padding: 15px 10px;
}

.scroll-nav__heading {
	font-size: 1.7em;
	text-indent: -16px;
	width: 170px;
	color: #000;
 }

.scroll-nav__heading:before {
	font-size: 1.654411765em;
	position: relative;
	right: -0.30em;
	top: -0.07em;
  }

.scroll-nav__list {
	margin-bottom: 0;
	list-style-type: none;
}


.scroll-nav__item {
    font-size: 18px;
    line-height: 1.5;
    overflow: visible;
    width: 170px;
}

.scroll-nav__item:before {
	width: 30px;
}

.scroll-nav__item.active {
    -webkit-transform: scale(1.2, 1.2);
    -moz-transform: scale(1.2, 1.2);
    -ms-transform: scale(1.2, 1.2);
    -o-transform: scale(1.2, 1.2);
    transform: scale(1.2, 1.2);
    padding-left: 0.5em;
 }

.scroll-nav__item.active a:hover {
	font-weight: bold;
}

.scroll-nav__list .scroll-nav__link {
	padding-left: 30px;
	color: #000;
}

.scroll-nav__link:hover  {
	color: #e5554e;
}
Giving us…

Options
There are a number of additional options you can set in the javascript initialise file
jQuery('.content .post').scrollNav({
    sections: 'h2',
    subSections: false,
    sectionElem: 'section',
    showHeadline: true,
    headlineText: 'Scroll To',
    showTopLink: false,
    topLinkText: 'Top',
    fixedMargin: 40,
    scrollOffset: 40,
    animated: true,
    speed: 500,
    insertTarget: this.selector,
    insertLocation: 'insertBefore',
    arrowKeys: false,
    onInit: null,
    onRender: null,
    onDestroy: null
});
Some of these are self explanatory others you can reference a bit more info here. So for example for the initial menu element target you could change the ‘sections:’ value from ‘h2‘ to ‘h3‘.
Also some layout considerations need to be made to the page, such as removing a sidebar and what to do at a smaller viewport size, hide the menu or swap in some icon fonts instead.