All external USB disks can be formatted to work on Mac OSX, but not always straight out of the box.
In this tutorial we look at formatting disks via the GUI app called Disk Utility and its equivalent command line tool diskutil. This will work in all modern versions of Apple Mac OSX including 10.9 Mavericks, 10.8, 10.7 and 10.6.
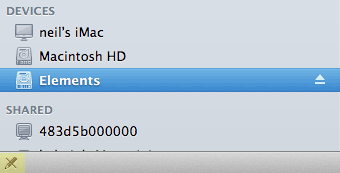
Initially external disks may be formatted for Windows and after you connect it to your Mac it appears in the device list in the Finder, but is a read only disk meaning that you can’t write to it in its current format.

The when the disk is selected in the finder bottom left symbol with the crossed out pencil means that the disk can only be read not written to. Why this is, is because they come formatted as Windows NTFS drive which OSX can only read, so we need to reformat them so we can read and write – thats where a handy utility called Disk Utility comes to the rescue.
Disk Utility

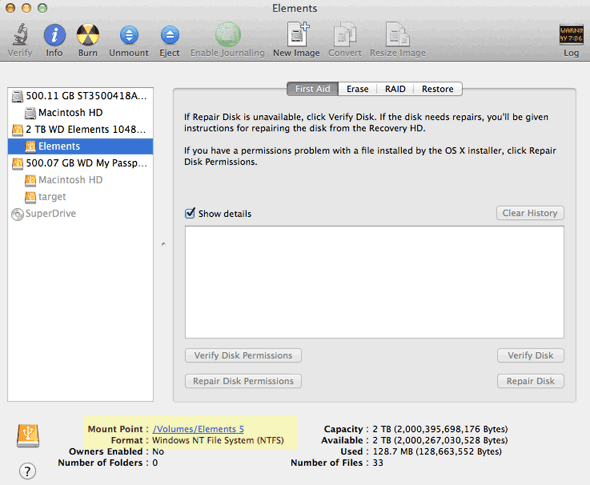
Disk Utility is found in /Applications/Utilities/Disk Utility.app, open it and select your external disk in the list on the left.
There are 2 items (or more) for each disk, you have the actual disk and the volume of the disk, the example below has the Disk Named 2 TB WD Elements and the Volume is named Elements, this example uses the Volume which will in turn also format the Disk.

Then below you will see the Format type which will be NTFS or possibly MS-DOS (FAT), we need to reformat the volume and make the format Mac OS Extended (Journaled).
Reformatting the Disk
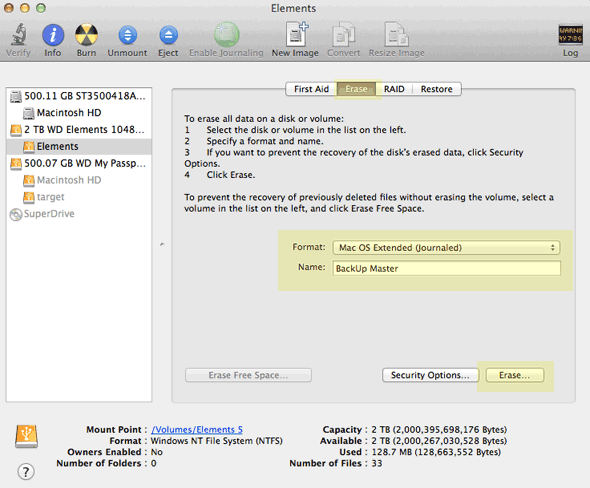
Still with the external disk selected in Disk Utility go to the Erase tab, select Mac OS Extended (Journaled) from the format dropdown, choose to name the disk and then click Erase.

And there you have it one read and writable disk ready for OSX.
The Security Options option next to erase can control how the disk is erased by zeroing out all the blocks on the disk, this then make it impossible to salvage any previous data, with new disks this is not necessary.
Also the other format option Mac OS Extended (Case-sensitive, Journaled) in the dropdown would allow you have same name files or folders in the same location with a mix of case like ‘red’ and ‘RED’, this is popular in the Linux disk format and also possible on OSX but not the default on OSX shipped disks.
Doing it on the line
You can also do this using the command line using the tool diskutil which is the command line interface to Disk Utility, launch Terminal, Applications/Utilities/Terminal – to see a list of your disks:
diskutil list
and the results are similar to:
neilg@[~/Sites/wp2]: diskutil list
/dev/disk0
   #:                       TYPE NAME                    SIZE       IDENTIFIER
   0:      GUID_partition_scheme                        *500.1 GB   disk0
   1:                        EFI EFI                     209.7 MB   disk0s1
   2:                  Apple_HFS Macintosh HD            499.2 GB   disk0s2
   3:                 Apple_Boot Recovery HD             650.0 MB   disk0s3
/dev/disk2
   #:                       TYPE NAME                    SIZE       IDENTIFIER
   0:     FDisk_partition_scheme                        *2.0 TB     disk2
   1:               Windows_NTFS Elements                2.0 TB     disk2s1
/dev/disk3
   #:                       TYPE NAME                    SIZE       IDENTIFIER
   0:      GUID_partition_scheme                        *500.1 GB   disk3
   1:                        EFI EFI                     209.7 MB   disk3s1
   2:                  Apple_HFS Macintosh HD            250.0 GB   disk3s2
   3:                  Apple_HFS target                  249.0 GB   disk3s3
   4:                 Apple_Boot Recovery HD             650.0 MB   disk3s4
This gives us a lot of information including the disk identifiers, size of disk and partitioning scheme. So in this example we will reformat the actual disk, disk2 using the command:
diskutil eraseDisk JHFS+ BackupMaster disk2
Here the command diskutil eraseDisk does the erasing, format is expressed as JHFS+ which is the Mac OS Extended (Journaled) and disk is named BackupMaster and the actual target disk is defined by its identifier disk2. The Terminal will result in this output:
Started erase on disk2
Unmounting disk
Creating the partition map
Waiting for the disks to reappear
Formatting disk2s2 as Mac OS Extended (Journaled) with name BackupMaster
Initialized /dev/rdisk2s2 as a 2 TB case-insensitive HFS Plus volume with a 155648k journal
Mounting disk
Finished erase on disk2
And there you have it one formatted disk ready to go.