Part 2 – InstaDMG Tutorial on the basics of creating an image with OSX Mountain Lion 10.8.
Please refer to Part 1 to get familiar with the basics of creating a simple ‘out of the box’ InstaDMG image of OSX 10.8.
Moving on from the initial image created with InstaDMG which will boot the Mac to a typical new vanilla installation of Mountain Lion, InstaDMGs real power is discovered in package and application installation and various scripts which can be bundled with the image, this tutorial extends from the base image to include a default user and also a small package which enables the image to boot up to bypass the default Apple Registration process so you are just booted straight to the login screen for the already created user.
This process requires a familiarity with basic Linux commands in OS X’s Terminal. Part 2 assumes you have the base OSX 10.8 image already in InstaDMG, in the required path ~/InstaDMG/OutputFiles/
The location of the InstaDMG source directory in this tutorial is set in the root level of the user home directory – ~/InstaDMG
Bypassing the Registration Process
Normally when a new OS is installed the user is forced to go through the registration and account process, this can be bypassed by adding a couple of files to the image that InstaDMG is creating
Download clearReg.dmg and expand the .dmg to reveal ClearReg.pkg which is basically a script that will create 2 empty files in these locations:
/Library/Receipts/.SetupRegComplete
/private/var/db/.AppleSetupDone
Just the presence of these files will bypass the installation registration processes and take the user straight to the login window.
– Expand the downloaded clearReg.dmg and move the contents “ClearReg.pkg” into the InstaDMG package repository:
~/InstaDMG/InstallerFiles/InstaUp2DatePackages/
Anything filed in here can be used to extend the functionality of the base image including script packages to full blown 3rd party application installs.
Create New User
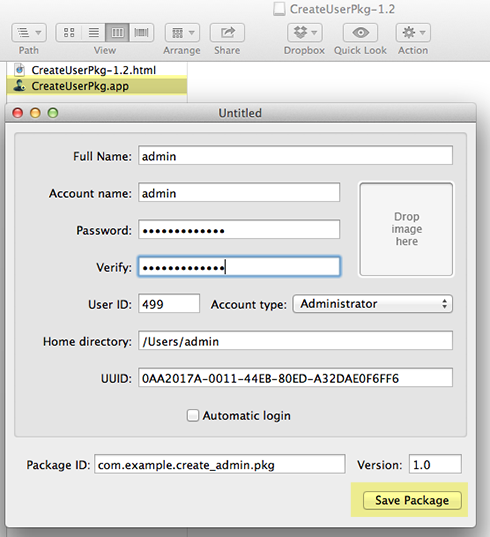
To create a new user account, InstaDMG comes bundled with an application called oddly enough “CreateUserPkg-1.2.dmg” in your InstaDMG installation directory:
~/InstaDMG/AddOns/createUser/CreateUserPkg-1.2.dmg
This is a great advancement compared to how it had to be done previously.
Launch CreateUserPkg.app and create an account and save the package to ~/InstaDMG/InstallerFiles/InstaUp2DatePackages/
With the packages ready and in place now we have to add these packages to a catalog file that will be used to build the image – these packages need to have checksums to verify their validity.
Checksums and Catalogs
Checksums
The last two steps are creating checksums for the packages and then assigning the packages into catalogs to build the image. The checksum is a guarantee that the package is valid from its initial creation, and typically needs to be applied to the packages stored in the InstaUp2DatePackages directory :
~/InstaDMG/InstallerFiles/InstaUp2DatePackages/
The easiest way to do this in bulk is to run the checksum.py command on all the packages in InstaUp2DatePackages – the checksum.py command lives in ~/InstaDMG/Addons/InstaUp2Date/ – so:
cd ~/InstaDMG/Addons/InstaUp2Date/
./checksum.py ~/InstaDMG/InstallerFiles/InstaUp2DatePackages/* > checksums.txt
This will pipe the output of the checksum command to a file checksums.txt in the InstaUp2DatePackages directory – open that in TextEdit or vi or nano, the contents of the file need to be pasted into the new catalog.
You can also choose to run the “checksum.py” command without piping the output to a file, this way it will display verbosely in the terminal window – this can be handy for doing single checksums for later added packages. Just drag the package to the terminal window when running the checksum.py command. The checksum format will be like so:
create_admin-1.0 create_admin-1.0.pkg sha1:f3a7b08b73319b0d47f3cf8f8d3dc8eacae5904a
Catalogs
The final piece is creating and adding these packages to a new catalog. Catalogs are plain text files and located in:
~/InstaDMG/AddOns/InstaUp2Date/CatalogFiles
There is a whole bunch of them, some are for specific hardware builds and different OSX versions these catalog files are responsible for building the image and can call on each other linking to customize the image build.
In this instance we are using the generic OSX 10.8 which is the “10.8_vanilla.catalog”. You can just add the 2 items in the 10.8_vanilla.catalog and just use the one catalog in the process. But by doing this when InstaDMG catalogs are updated you will lose your changes.
Its better to keep non-OS upgrades in a separate catalog and add the 2 new packages to their own catalog which in turn then calls the 10.8_vanilla.catalog. In this instance the additional catalog is called ‘mlextras.catalog’
You can call the catalog whatever you like just add the .catalog extension and file it in the path as above with the other catalogs, the format of the catalog needs to be like this:
# This is the catalog for the Addon MountainLionExtras Settings -
include-file: 10.8_vanilla.catalog
Third Party Software:
clearReg clearReg.pkg sha1:b0ba0f6bfd26956562e286bbcdfa8f78dd3722eb
create_admin-1.0 create_admin-1.0.pkg sha1:f3a7b08b73319b0d47f3cf8f8d3dc8eacae5904a
The first line is just a comment as indicated by the hash.
The second line calls for the “10.8_vanilla.catalog” to also be run for the image.
The last 2 lines label the description of the package/the package name/checksum of the package – it is very important that these are tab separated not space separated eg:
/tab/clearReg/tab/clearReg.pkg/tab/sha1:b0ba0f6bfd26956562e286bbc…
Here is an example you can download.
The Build
Finally you can run the catalog command with sudo this will run the 10.8_vanilla.catalog first and then apply the mlextras.catalog on top :
cd ~/InstaDMG/AddOns/InstaUp2Date/

sudo ./instaUp2Date.py -p mlextras
The build process is output verbosely on the screen -in time an up to date image is spat out in the directory – “~/InstaDMG/OutputFiles/” named “10.8 Vanilla.dmg” which is the all encompassing new master image with the new user and clear registration files applied.
Image a machine with the newly created disk image and test the login process with the new user.

