
InstaDMG Part 3
After tutorials Part 1 & Part 2 with InstaDMG which deal with doing a basic OSX Mountain Lion 10.8 build and then introducing a user account and clearing the Set Up Assistants on boot, it’s time to tweak some preferences on OSX 10.8 for the first time boot, includin such as computer name, network, time zone and set applications preferences for Safari and the Finder.
The only tool you will need is Apple’s PackageMaker application which is part of the Auxiliary Tools for Apples Xcode 4.6 and is available for a free download at the developer site at Apple, sign up for free and look for Auxiliary Tools for Xcode in the downloads section.
Once the Auxiliary .dmg is downloaded just copy all the contents to the Applications folder – to keep things in a sensible order make a folder called Xcode Tools and copy the contents into that – from there PackageMaker can be accessed.

xcode-package-maker
Steps
- Step 1 Download firstboot.dmg
- Step 2 a) Rename files quick
- Step 2 b) Rename files long
- Step 3) Customise firstboot.sh
- Step 4) Customise postflight.sh
- Step 5) PackageMaker Build
- Step 6) Checksum
- Step 7) Add to catalog
- Step 8 ) InstaDMG Build
Download FirstBoot Package
Required for this tutorial is the firstboot package script, available here which can be customized to your needs, this has been made available courtesy of Nate Walck at osxdeployment.com
The package contains a directory structure which needs to be maintained throughout and post the editing process, there are 2 key scripts; firstboot.sh and postflight.sh that customize settings for the image that you are building, firstboot.sh sets up a lot of workstation variables such as computer name/network settings/date & time zone prefs etc and the postflight.sh sets up any custom preferences such as preferences to the Desktop and applications like Safari.
Download the firstboot.dmg, open it, copy the contents into a new folder named ‘firstboot’, the key thing here is to rename a couple of components to your environment, set your preferences in the scripts, package the scripts and then use as an install package to be included with InstaDMG build process.
Rename the Required Files to your Environment
Easy Smart Way

instadmg-plist-script
Open:
firstboot/ROOT/Library/LaunchDaemons/edu.someuni.firstboot.plist
It will open in the Property List Editor (part of Xcode) – change the Label value to com.someuni.firstboot as in the grab above Then move onto customising the scripts.
Longer Official Way
Rename this file to your type of domain:
firstboot/ROOT/Library/LaunchDaemons/edu.someuni.firstboot.plist
Edit the same file and change the label string as below, you can do this in Property List Editor or in a Text Editor:
<key>Label</key>
	<string> com.yourdomain.firstboot</string>
Rename the directory below to your company name: /Library/Scripts/CompanyName/ Next edit the firstboot.sh file, change line 34 to reflect the string from above –
srm /Library/LaunchDaemons/com.company.firstboot.plist
Customising The Scripts
firstboot.sh
Open the firstboot.sh script; located in – firstboot/ROOT/Library/Scripts/SomeUni/firstboot.sh In the firstboot.sh script there are a bunch of variables already set that customise the machine when the image is deployed to it. You can edit variables to suit your environment, you can add in your own settings too for example:
#Removes Time Machine from the menu
defaults write com.apple.TimeMachine DoNotOfferNewDisksForBackup 1
#Sets HostName of the Machine
scutil --set HostName $(scutil --get LocalHostName)
scutil --set ComputerName YourComputerNameHere
#disable ipv6
$networksetup -setv6off Ethernet
#Enable Airport
$networksetup -setnetworkserviceenabled AirPort on
# Activate WakeOnLAN.
$systemsetup -setwakeonnetworkaccess on
# ARD Configuration #Enable ARD for localadmin
$kickstart -configure -allowAccessFor -specifiedUsers
$kickstart -activate -configure -access -on -users "admin" -privs -all -restart -agent
# Set time zone and time server.
$systemsetup -setusingnetworktime on
$systemsetup -settimezone Australia/Sydney -setnetworktimeserver time.asia.apple.com
Just note in the ARD configuration options you need to specify which user to allow for Remote Deskop, the user example here follows on from the user account in part 2 “admin”.
postflight.sh
Open the next script, located at – firstboot/scripts/postflight.sh In the postflight.sh script further application and system preferences can be applied, set your default home page in Safari:
# Set Safari Preferences.

$defaults write "${USERPREFS_DIR}/com.apple.Safari" HomePage http://www.bbc.co.uk/
$defaults write "${USERPREFS_DIR}/com.apple.Safari" ShowStatusBar -bool YES
Show mounted sharepoints in the Finder:
# Set Finder Preferences.
$defaults write "${USERPREFS_DIR}/com.apple.finder" ShowMountedServersOnDesktop -bool YES
Turn off the Firewall
#Firewall Settings | 0 = Off | 1 = On For Specific Services | 2 = On For Essential Services
sudo defaults write "${PREFS_DIR}/com.apple.alf" globalstate -int 0
Turn on Bluetooth
# Turn on Bluetooth
sudo defaults write "${PREFS_DIR}/com.apple.Bluetooth" ControllerPowerState -bool YES
More examples found here. Once the 2 script files have been edited, save them and then its time to make the package.
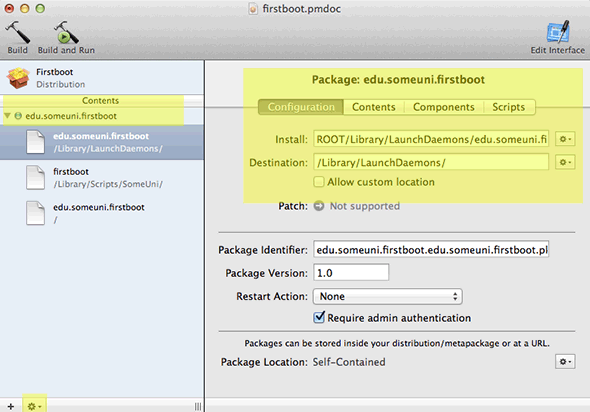
Making the Package with PackageMaker
Open the firstboot/firstboot.pmdoc which will open PackageMaker, click on the contents arrow to see the enclosed 2 files, these files need to have specific ownership and permissions:

packagemaker contents for firstboot
These files need to have root and wheel as the owner and group and the permissions must be set as 754, this is very important as otherwise they won’t execute, click on each file then the contents tab, then the file in the main window, then set the owner and group and permissions at the bottom left to be the same as below.
If you find that you can’t change the the ownership of these files close the Package Maker doc and change the ownership on the command line:
cd ~/firstboot
sudo chown -R root:wheel ~/firstboot/ROOT/Library/LaunchDaemons/edu.someuni.firstboot.plist ~/firstboot/ROOT/Library/Scripts/SomeUni/firstboot.sh ~/firstboot/scripts/postflight.sh
Don’t change the ownership settings on the Package Maker doc or you won’t be able to open it, open the doc back in Package Maker set the permissions save and build.

plist file permissions in packagemaker

firstboot file permissions in packagemaker
Roadblock on ‘edu.someuni.firstboot.plist’
I found that ownership on edu.someuni.firstboot.plist still maintained the wrong user & group in PackageMaker even though correctly set and verified on the command line. If this happens to you you need to re-add the file into PackageMaker.
– Drag the file that you have edited – edu.someuni.firstboot.plist into the Contents pane in the top item blue bubble icon “edu.someuni.firstboot”
– Click the ‘Configuration’ tab and copy paste the same inputs for ‘Install’ ‘Destination’ and ‘Package Identifier’ as the original
– Remove the older edu.someuni.firstboot.plist via the gear icon
If you had changed the name of these files to match your company name and reverse domain you will also need to update them where applicable in PackageMaker, in the Configuration tab in the fields, install, destination and package identifier. If you left the value as ‘SomeUni’ you do not need to change any values. The postscript.sh script is located in the scripts tab of the firstboot.sh, it needs no change.

postflight-script-packagemaker
Build and Save the package
Click on the ‘Build‘ icon in the top right and save the package in your InstaDMG packages folder, from the previous tutorial this was installed in the home directory:
~/InstaDMG/InstallerFiles/InstaUp2DatePackages/

build-firstboot-package
Checksum the Package
The final piece is to checksum the new packge and add it to the catalog and then run the InstaDMG build. To checksum a single package:
cd ~/InstaDMG/Addons/InstaUp2Date/ ./checksum.py ~/InstaDMG/InstallerFiles/InstaUp2DatePackages/Firstboot.mpkg
Output similar to:
Firstboot Firstboot.mpkg sha1:0248348dc4008f9df34e045b8cb1079a9d83b6e8
Add to InstaDMG Catalog
Add the output to your lion catalog, this example uses “mlextras.catalog” and is filed in:
~/InstaDMG/AddOns/InstaUp2Date/CatalogFiles
# This is the catalog for the Addon LionExtras Settings - include-file: 10.7_vanilla.catalog Third Party Software: clearReg clearReg.pkg sha1:b0ba0f6bfd26956562e286bbcdfa8f78dd3722eb CreateLionUser CreateLionUser.pkg sha1:83b4357037d82a254c5ef068c384e3fb2c1 Firstboot Firstboot.mpkg sha1:0248348dc4008f9df34e045b8cb1079a9d83b6e8

Run the InstaDMG Build
With those tasks done – you can run your catalog – build the image:
cd ~/InstaDMG/AddOns/InstaUp2Date/
sudo ./instaUp2Date.py -p mlextras
Use the image and test any customisations you’ve made, if they haven’t taken, verify the ownership and permissions are correctly set, if they are double check your naming convention of the required files. Part 1 Part 2