This is an introductory tutorial on using InstaDMG, a OSX package and image maker, to create clean never booted disk images of OSX 10.8 Mountain Lion.
Previous tutorials on InstaDMG and OSX 10.7 has three parts, base image, base image + user, base image + user and system modifications.
For those not familiar InstaDMG is a powerful command line tool application used to produce clean never booted OS X images, these images can include OSX incremental upgrades as well as 3rd party software and scripts.
This guide is for getting a clean never booted up to OSX 10.8.4 Mountain Lion Image. You will need the OSX 10.8 installer which is named the InstallESD.dmg
Get InstaDMG
Navigate to your home and create a directory name ‘instadmg’ and change directory to it.
cd ; mkdir instadmg ; cd instadmg
Download InstaDMG.
svn checkout http://instadmg.googlecode.com/svn/trunk .
Updating InstaDMG
As new OSX updates are made available the InstaDMG code is changed to include the new upgrades, to update InstaDMG, move into the directory it is installed in and run the svn update command:
cd ~/instadmg/
svn update
Preparing the Base OS X 10.8 Image
After the InstaDMG is downloaded the next step is to make a base installation image of OS X 10.8 Extract the InstallESD.dmg from the Lion.app after it is downloaded from the App Store and before it is installed, as when it is installed the app is then deleted – this guide shows how to reveal the InstallESD.dmg and also a guide to burn a generic copy of 10.8 to disk.
Move the InstallESD.dmg file from Mountain Lion in the path below in your InstaDMG location and move onto the next section:
~/instadmg/InstallerFiles/InstallerDiscs/InstallESD.dmg
Using the Catalog File
The catalog file is the all important file that contains the installer build numbers plus all the incremental OSX updates, the latest version of InstaDMG now has an OSX Mountain Lion 10.8 catalog file as at version revision 480.
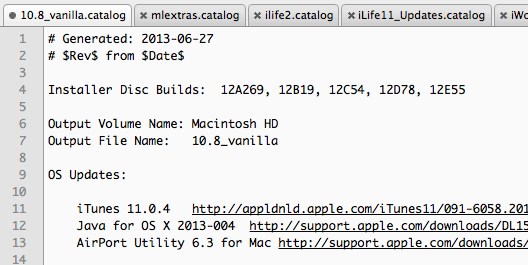
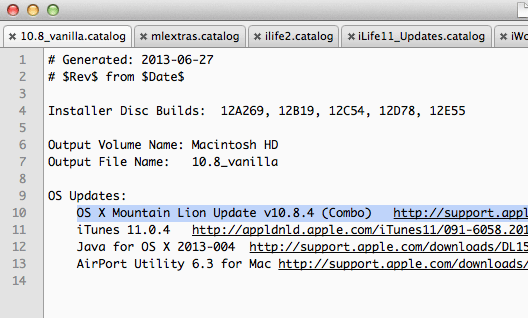
– The OSX 10.8 Build number for the initial build is at the top, 12A269, 12B19, 12C54, 12D78, 12E55
– Below are the OSX incremental updates in the format of name, download link and SHA1 encryption key – these are tab separated on one line per item (grab shows them soft wrapped).
– If you don’t want to include a certain update in the build just add a comment (#) to the beginning of the line.

If you only have an older install build you can add the latest OSX 10.8.4 combo, by adding in the update in the OS Updates section just paste in the line below.
OS X Mountain Lion Update v10.8.4 (Combo) http://support.apple.com/downloads/DL1659/en_US/OSXUpdCombo10.8.4.dmg sha1:3c95d0c8d0c7f43339a5f4e137e386dd5fe409c3

Make The OSX Image
Move into the InstaDMG location and to build the image you run the all important instaUp2Date command with sudo.
cd ~/instadmg/AddOns/InstaUp2Date/
sudo ./instaUp2Date.py -p 10.8_vanilla
The .catalog extension does not need to be added in running the command. The command will take a while to run depending on your RAM and processor power. The OS X incremental updates are downloaded and stored on your local drive, future builds will only pull down new updates.
The disk image is spat out in the directory – “~/InstaDMG/OutputFiles” named “10.8 Vanilla.dmg” which is the all-encompassing new master image. The final output at the tail of the command in the Terminal will be like this:
13:05:40 ###### Creating the deployment DMG and scanning for ASR ######
Rename the deployment volume: Macintosh HD
Create a read-only image
Scanning image for ASR: /InstaDMG/OutputFiles/10.8 Vanilla.dmg
ASR image scan complete
13:12:00 ###### InstaDMG Complete ######
13:12:00 ###### Cleaning up ######
Ejecting images
Deleting scratch DMG
Done
And there you have it one OSX 10.8 image ready for deployment, which can be used in any deployment method including ASR, DeployStudio or as a NetBoot image.
You may get errors when running the command above such as:
Unable to find OS Installer disc in any provided folder: ['/InstaDMG/InstallerFiles/InstallerDiscs'
But you do have the installer disc filed in the right place! – just reboot and try again.
Restoring via ASR
You could push this image to another drive using ASR – this will erase your target Volume:
sudo asr restore -source /pathto/10.8\Vanilla.dmg -target/Volumes/pathtodisk -erase -noverify
Part 2 of this InstaDMG tutorial takes you through setting up a local user account on the images and adding files that allow you to bypass registration process.
Part 3 take you through setting computer prefs and system preferences
